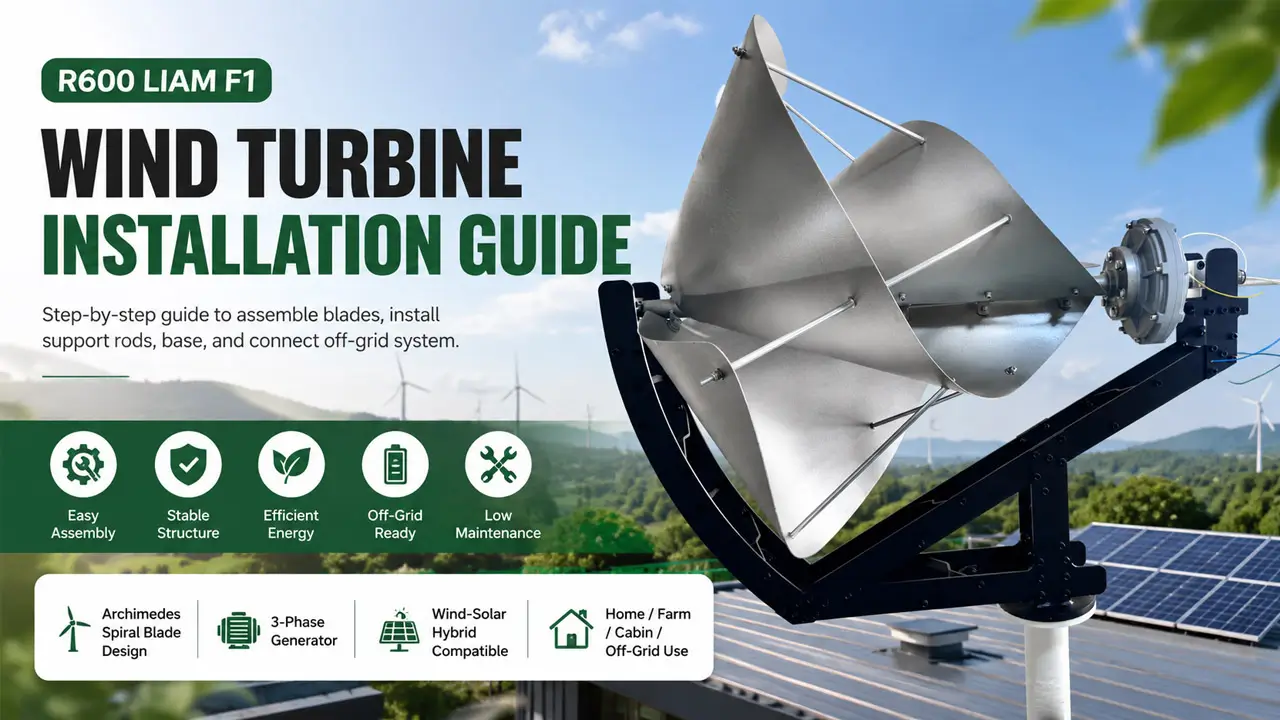
When you install the R600 Liam F1 Wind Turbine, you are not only fixing a small wind turbine onto a base. Instead, you are building a complete rotating structure that depends on correct blade direction, support rod placement, protective sleeve direction, base alignment, and safe off-grid connection.
Therefore, before you start the installation, you should understand the full assembly path. This guide shows you how to install the fiberglass blades, long and short support rods, base structure, controller, battery, and inverter step by step.
In addition, you will learn what to check before installation, how to avoid common assembly mistakes, and how to maintain your R600 Liam F1 Wind Turbine for long-term use.
First, you align the blade holes from bottom to top. You should keep the rough side inside and the smooth side outside.
Next, you use the correct 1st, 3rd, and 5th blade holes. You should also add protective sleeves between blade sections.
Then, you use the correct 2nd and 4th blade holes. You should make sure the protective sleeve opening faces downward.
Finally, you align the flange holes with the generator holes. After that, you fix the support base and bracket evenly.
This installation pathway matters because your Archimedes-style wind turbine relies on balanced blade stress and stable support geometry. If you force one hole, reverse one sleeve, or mix one support rod, the turbine may vibrate, rotate unevenly, or suffer premature wear.
Installer Tip: Do not fully tighten the first few nuts too early. Instead, you should gently fix each hole first, complete the full blade alignment, and then tighten all nuts evenly. As a result, you can reduce blade deformation and uneven stress.
What Is the R600 Liam F1 Wind Turbine?
The R600 Liam F1 Wind Turbine is a compact Archimedes-style small wind turbine. If you need a wind turbine for a home, rooftop, garden, villa, farm, cabin, landscape project, or small off-grid power system, this model gives you a more compact and visually friendly option.
In addition, you get a structure that includes three fiberglass blades, a main shaft, a 3-phase generator, long and short support rods, protective sleeves, a bearing housing, and a support frame. Because the turbine has a spiral appearance, you can use it in projects where both energy generation and visual design matter.
Fiberglass Blades
You need to install three lightweight blades with correct direction, hole alignment, and even tightening.
3-Phase Generator
You should align the generator with the base and connect it through a wind controller.
Off-Grid Ready
You can connect the turbine with a controller, battery, inverter, and solar panels.
R600 Wind Turbine Parts Checklist
Before you assemble the turbine, place all components on a clean surface and check the full parts list. Then, separate the long and short support rods. After that, identify the long and short protective sleeves before installation.
| Component Name | Quantity | Specification Remarks |
|---|---|---|
| Main shaft | 1 | Default black |
| Blade | 3 | Fiberglass |
| Generator | 1 | 3-phase generator |
| Support rod | 6 | 3 long rods and 3 short rods |
| Protective sleeve | 6 | 3 long sleeves and 3 short sleeves |
| Washer / Shim | 80 | Extra spare parts are usually included |
| Spring | 80 | Extra spare parts are usually included |
| Rubber pad | 30 | Extra spare parts are usually included |
| Screw | 30 | Extra spare parts are usually included |
| Nut | 30 | Extra spare parts are usually included |
| Bearing housing | 1 | Default black |
| Support frame | 6 | Default black |
Assembly Tip: Do not mix the long and short rods. Because the support rod length directly affects the blade support geometry, you may cause poor rotation if you install the wrong rod in the wrong hole position.
Before Installation: What You Should Check
Before you install the R600 Liam F1 Wind Turbine, check the site, tools, and system compatibility. First, you should choose a location with stable wind exposure. Next, you should confirm that the mounting structure is strong enough for long-term operation.
However, if you plan to install the turbine on a rooftop, you should pay more attention to structure, vibration, turbulence, and safe access. If you install it in a yard or on the ground, you should choose an open area with fewer trees, walls, or buildings around the turbine.
Rooftop
You should check structure, vibration, turbulence, and safe access before installation.
Yard
You should choose an open area and avoid trees, walls, and nearby buildings.
Off-Grid
You should match the turbine with controller, battery, inverter, and protection devices.
Step 1: Install the Fiberglass Blades
First, you should install the blades from bottom to top. The rough side should face inside, while the smooth side should face outside. Then, you should gently tighten each hole nut first instead of fully locking it immediately.
After the last hole is installed, you should tighten all nuts evenly. In this way, you reduce the risk of blade deformation, cracking, or hole damage.
In addition, the last spindle hole is slightly biased to the right. Therefore, you need to bend the blade inward slightly and fix it with tools. However, you should not use excessive force. Adjust the hole position first, and then tighten slowly.
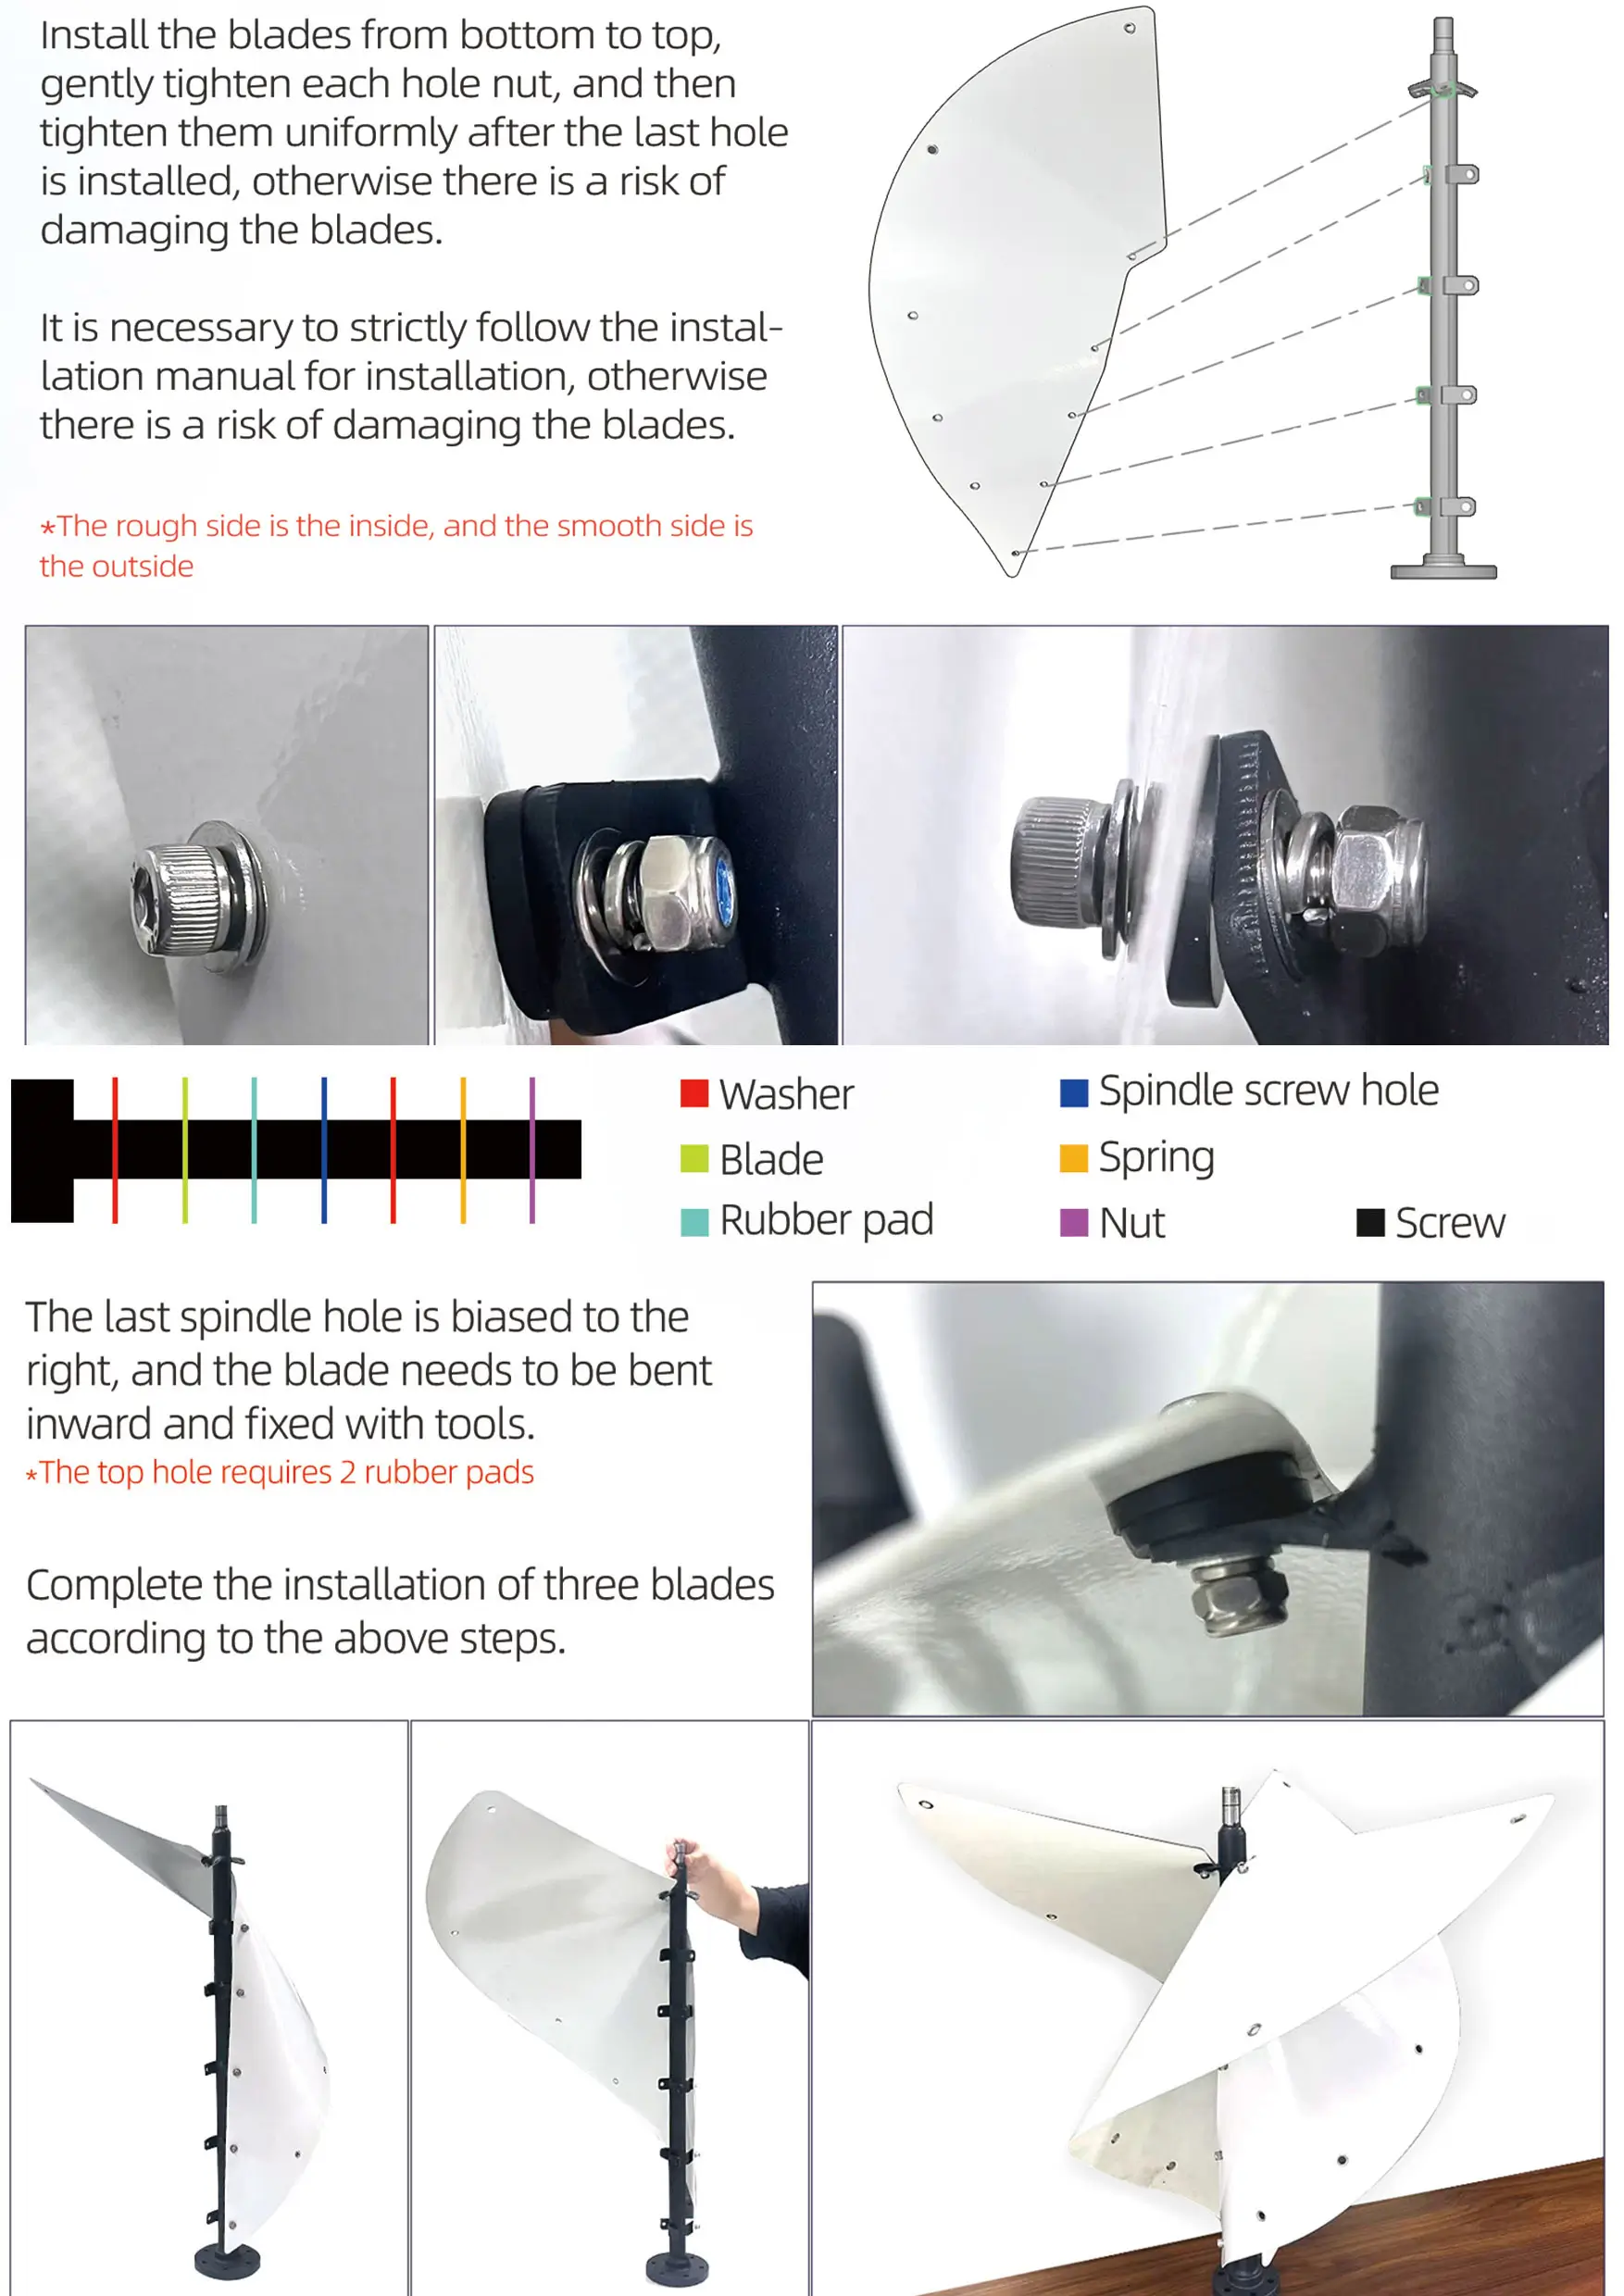
| Check Item | Correct Method | Why It Matters |
|---|---|---|
| Blade direction | You keep the rough side inside and the smooth side outside | This helps you keep the correct aerodynamic structure |
| Nut tightening | You gently tighten first, then tighten evenly | This helps you prevent blade deformation and uneven stress |
| Top hole | You use two rubber pads | This helps you reduce concentrated pressure on the blade |
Step 2: Install the Long Support Rods
Next, you need to install the long support rods. These rods connect three blade positions and improve the overall stability of the blade structure. The long support rod should pass through the 1st hole of the first blade, the 3rd hole of the second blade, and the 5th hole of the third blade.
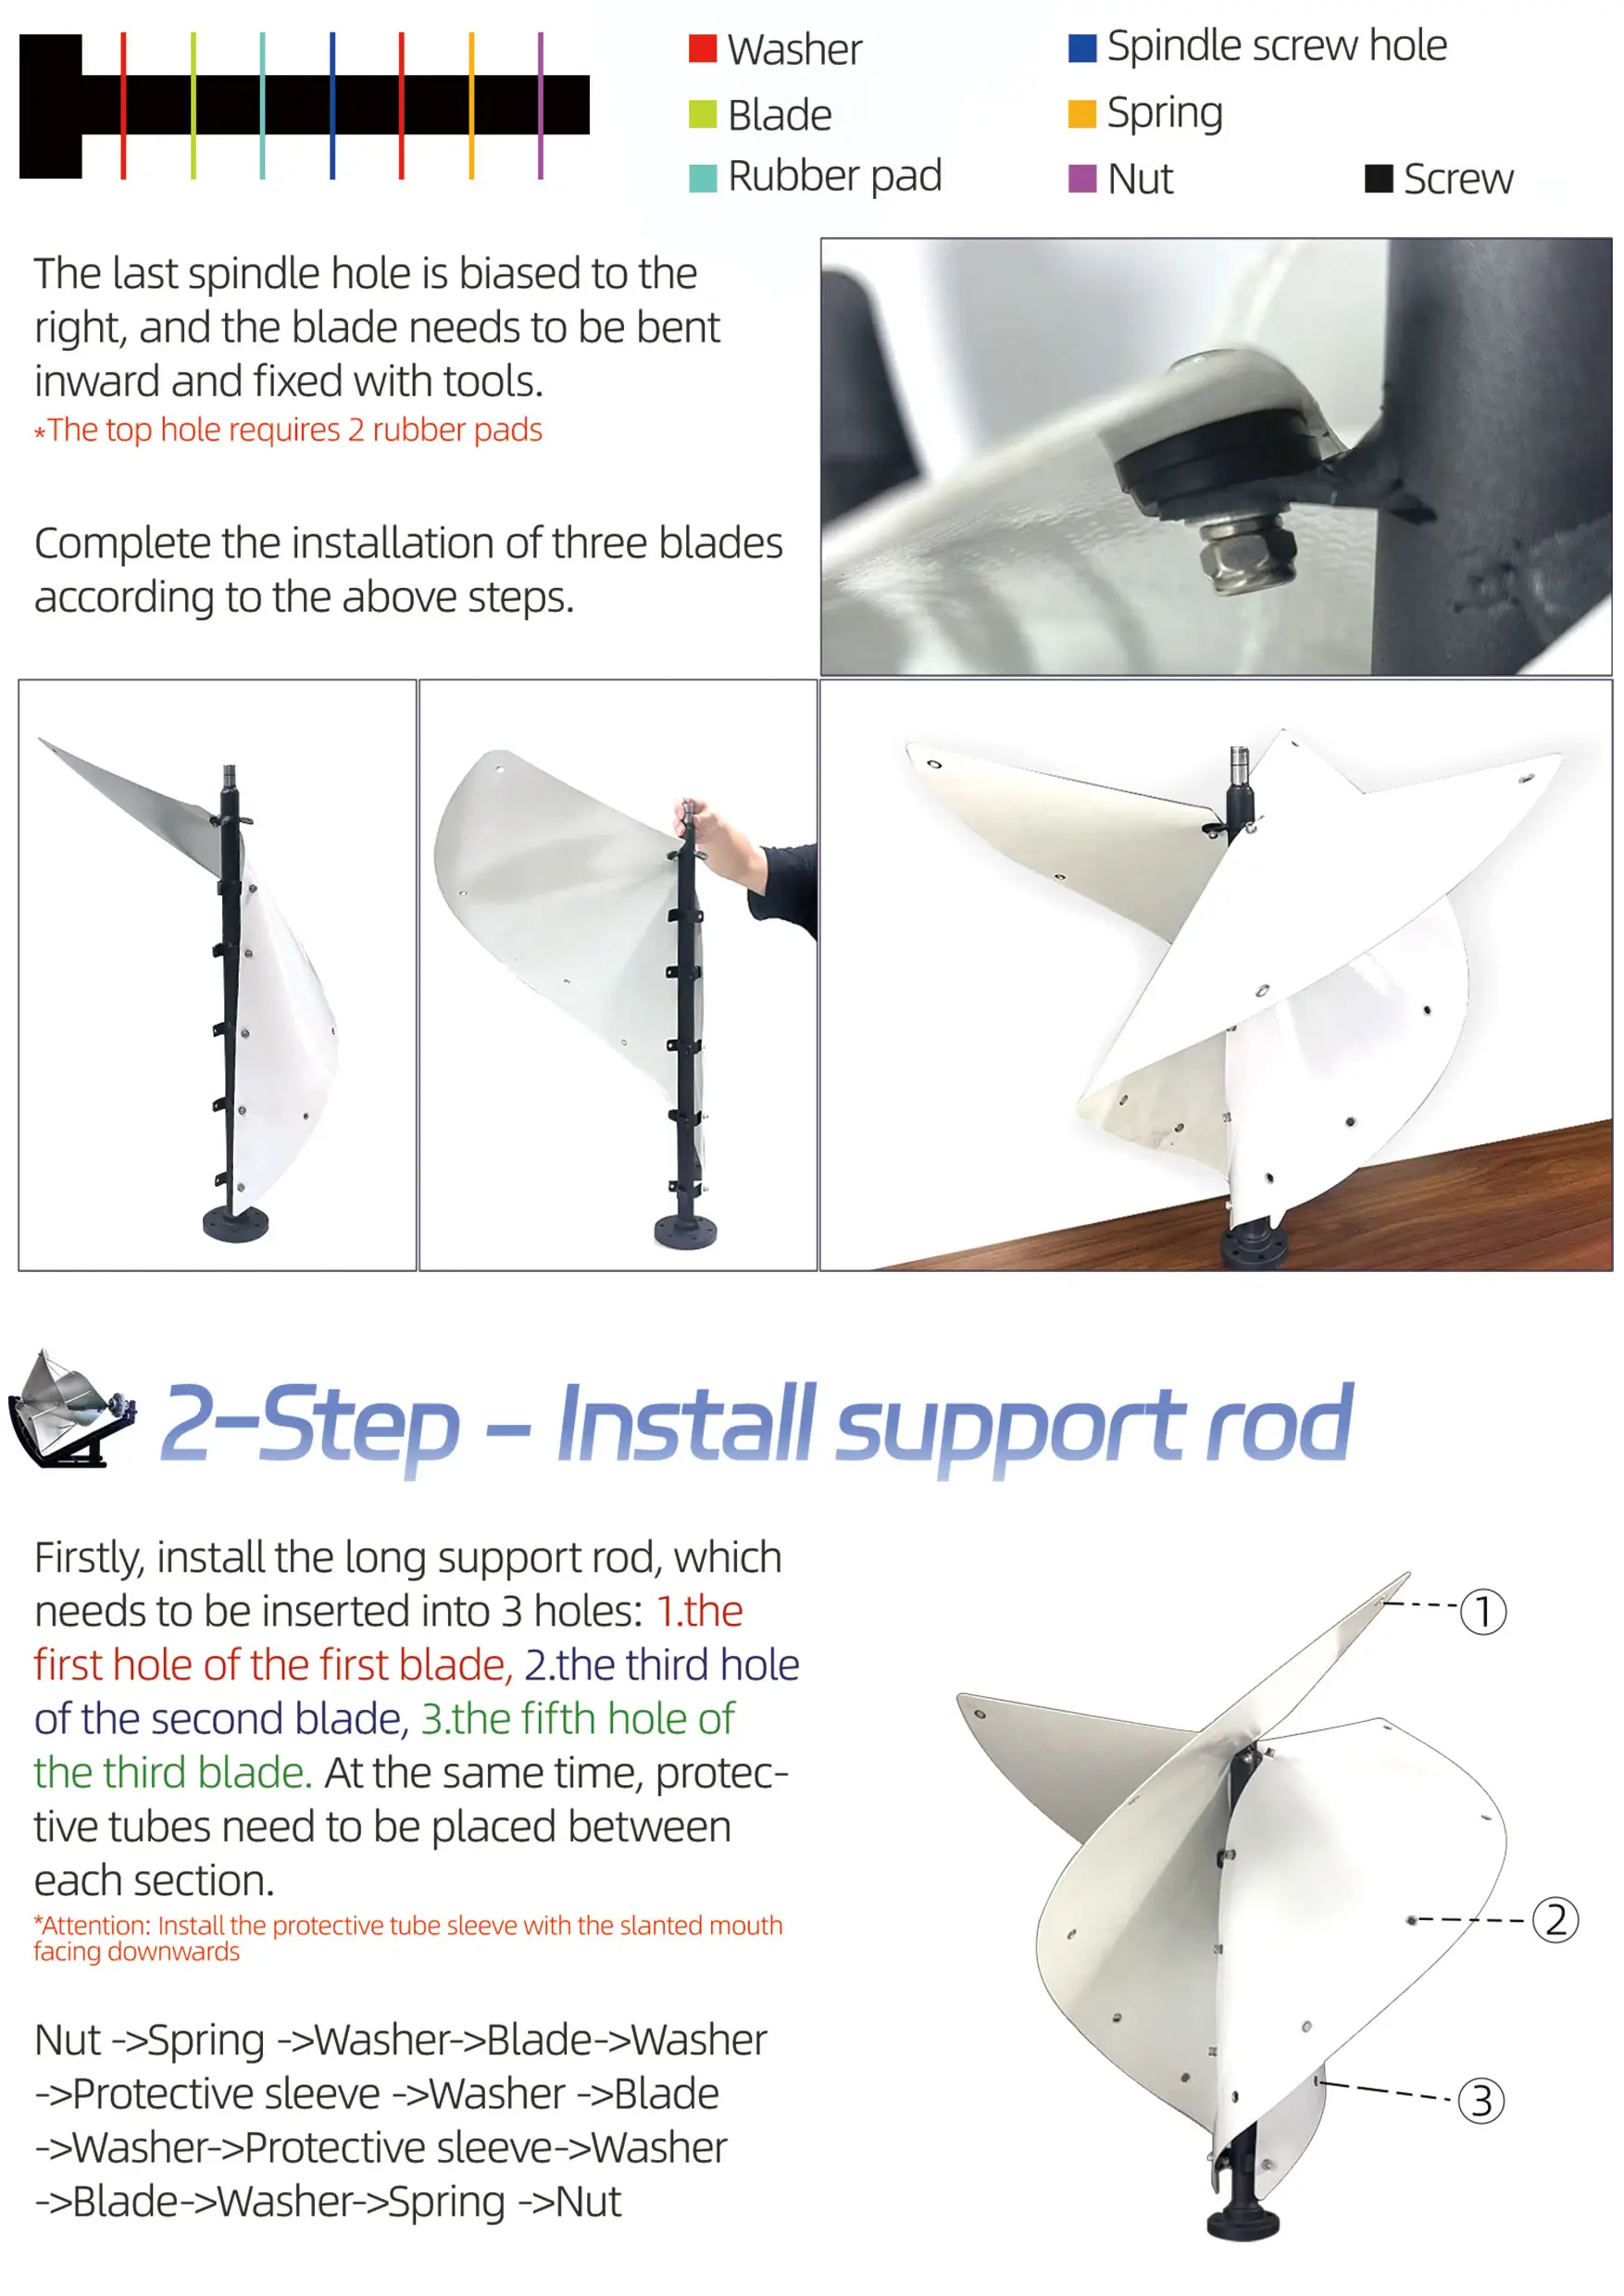
Important: You should place protective sleeves between blade sections. Moreover, the slanted opening of the protective sleeve should face downward. Long and short protective sleeves are not interchangeable.
Step 3: Install the Short Support Rods
After that, you should install the short support rods. Unlike the long rods, the short support rods connect only two blade positions. They should correspond to the 2nd hole of the first blade and the 4th hole of the second blade.
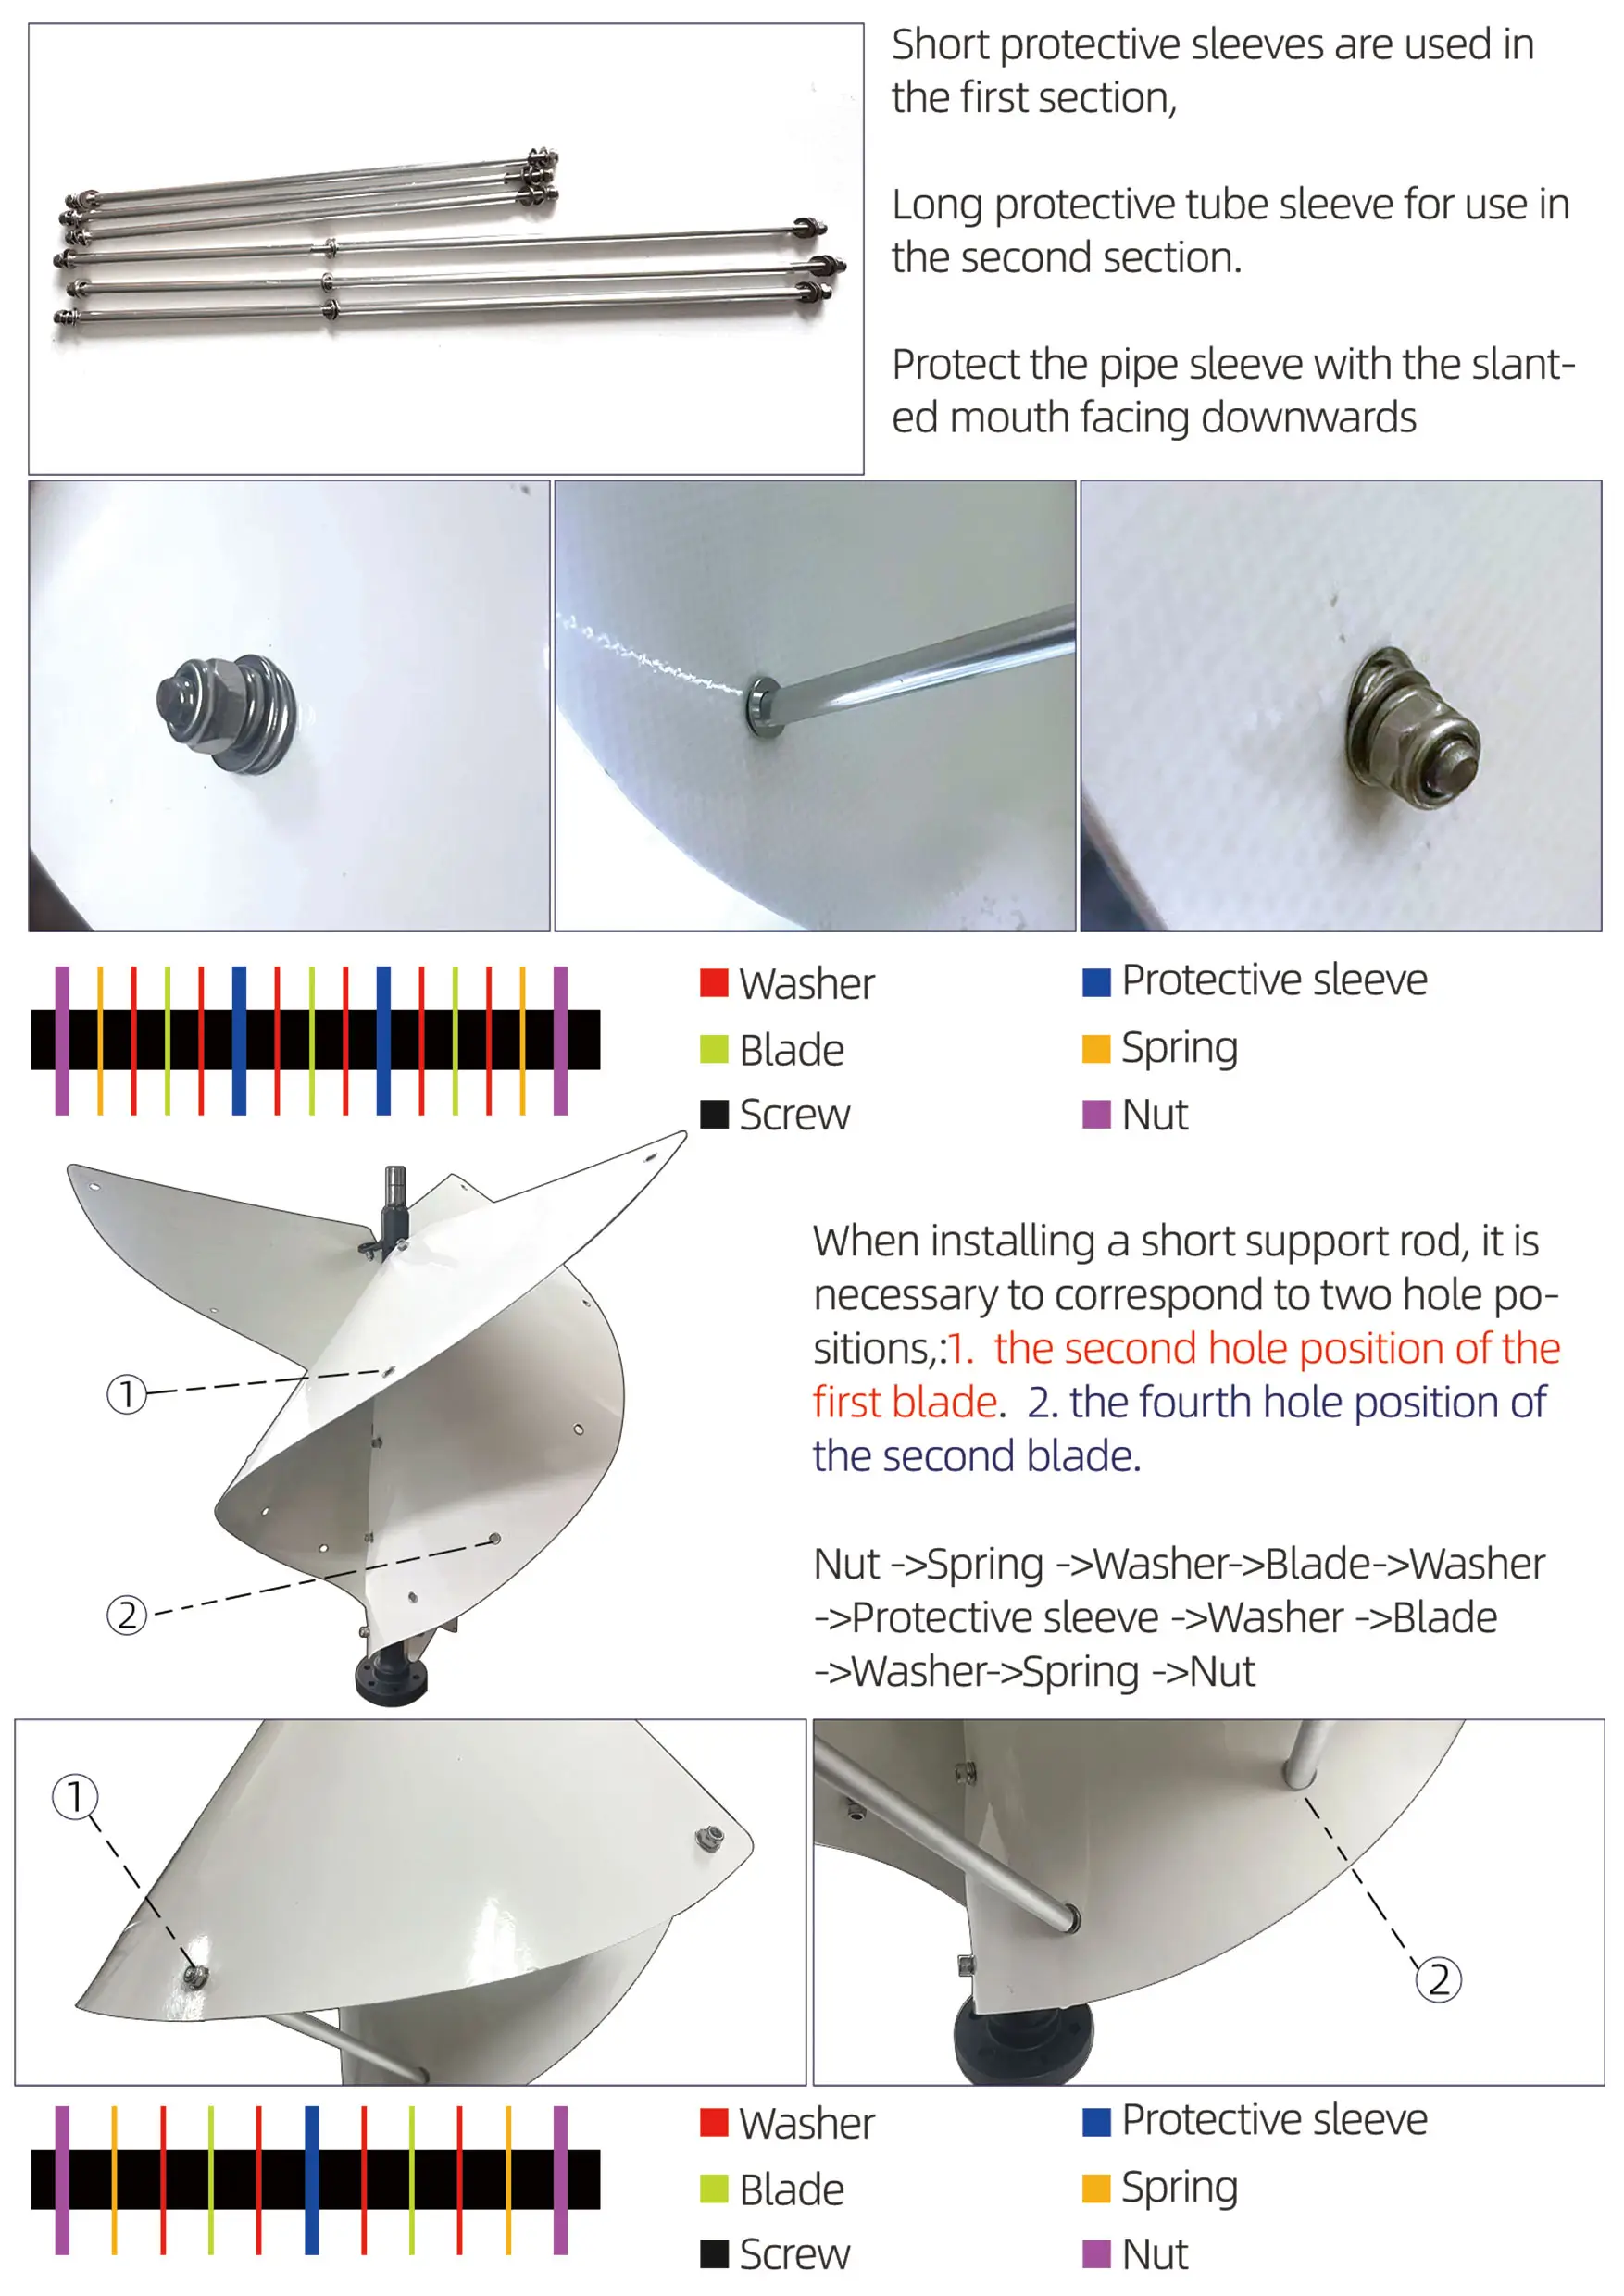
Once you finish installing the short support rods, check whether the blade spacing is even, whether the support rods are straight, and whether all nuts are tightened evenly. If you notice uneven spacing, adjust the structure before you continue.
Step 4: Combine the Wind Turbine with the Base
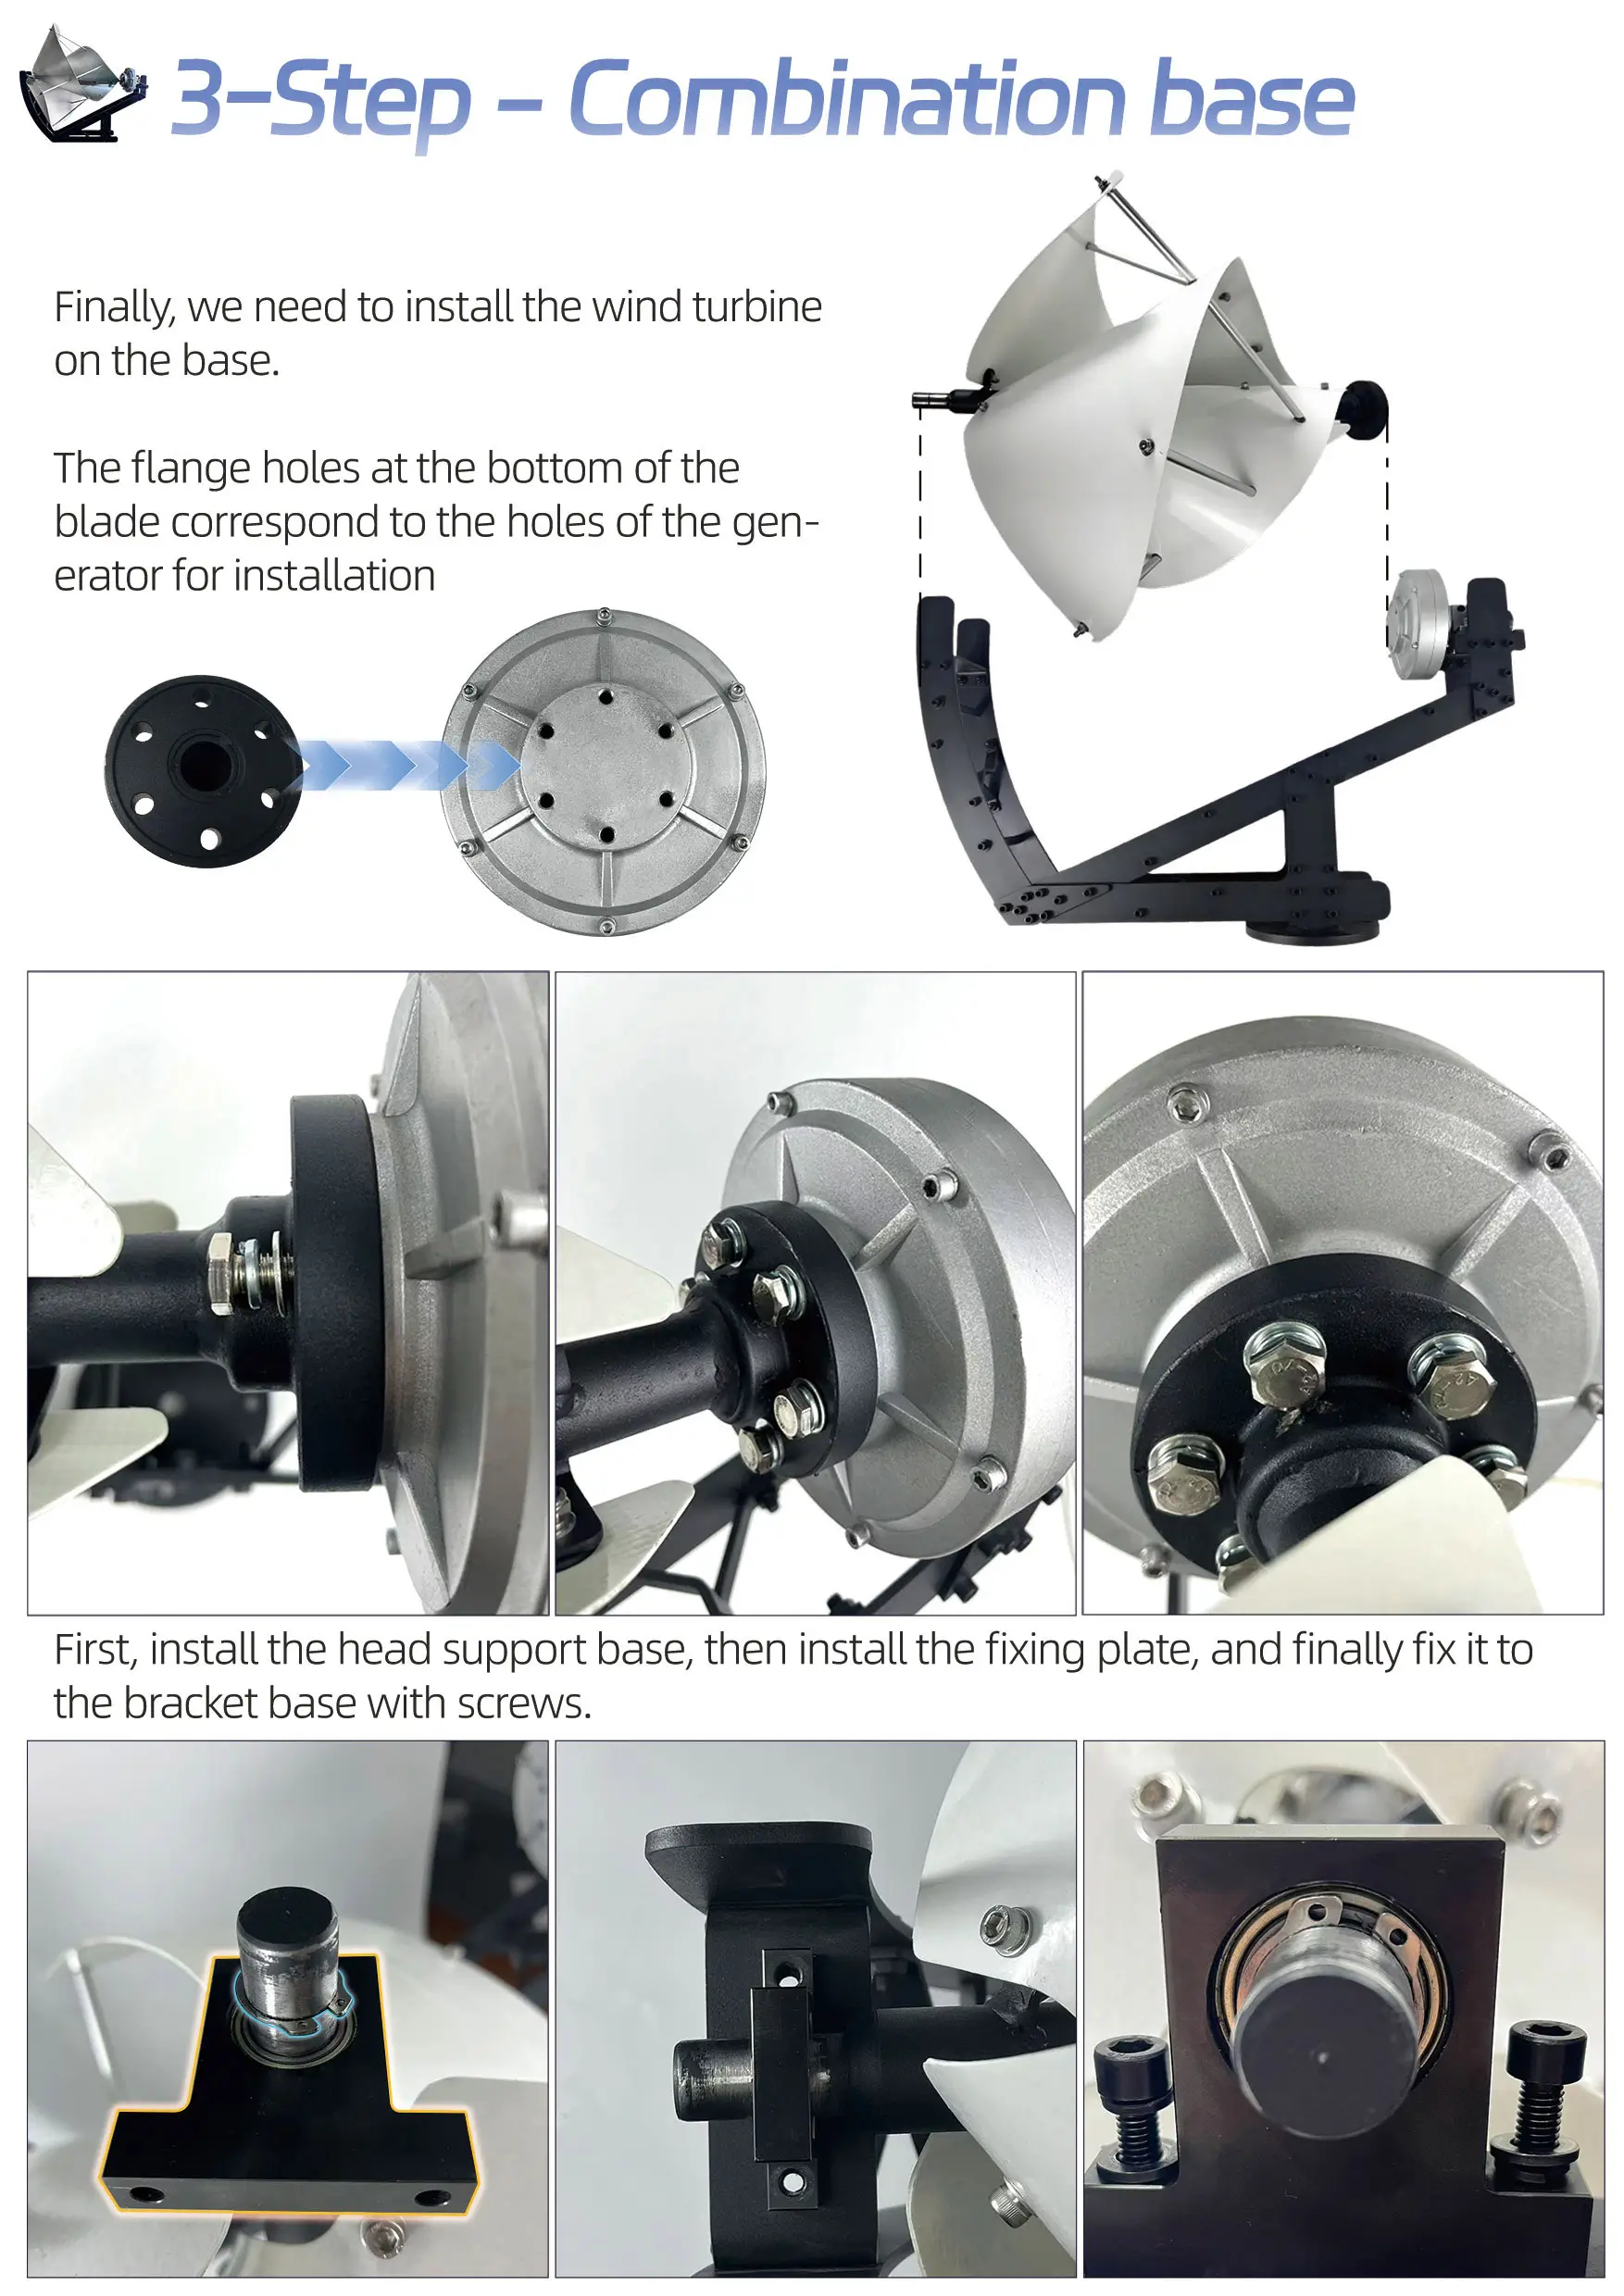
Finally, after you assemble the blades and support rods, you can combine the rotor section with the generator and base. The flange holes at the bottom of the blade assembly should correspond to the generator holes.
However, you should not force the holes into position. If the holes do not align naturally, adjust the rotor angle first. Then, tighten the screws step by step.
→
Install Fixing Plate
→
Fix to Bracket Base
How to Connect the R600 Liam F1 Wind Turbine to an Off-Grid System
Once you complete the mechanical assembly, you can connect your R600 Liam F1 Wind Turbine to a small off-grid system. In addition, you can combine it with solar panels if you want a wind-solar hybrid system.
However, you should regulate the electricity generated by the turbine before you use it for household or project loads. Therefore, you should connect the turbine to a wind controller first.
→
Wind Controller
→
Battery
→
Inverter
→
AC Load
Electrical Reminder: You should not connect the turbine directly to the battery. Instead, you should connect it to the wind controller first. Then, you should match the controller voltage, battery capacity, inverter power, and dump load protection with your complete system design.
Installation Environment Guide
A good installation site can improve your turbine performance and reduce your long-term maintenance pressure. Therefore, when you choose the installation method for the R600 Liam F1 Wind Turbine, you should consider wind exposure, mounting strength, cable distance, and your final application.
| Installation Site | Best Use Condition | Installation Priority | Your Benefit |
|---|---|---|---|
| Rooftop | Compact home projects | Structure, vibration, turbulence | You save space and improve visual integration |
| Yard / Garden | Homes, villas, and landscape projects | Open wind path and easy maintenance | You get easier access for inspection and cleaning |
| Farm / Cabin | Small off-grid power demand | Tower height and cable distance | You can support lighting, monitoring, and backup power |
| Wind-Solar Hybrid | Remote or unstable-grid areas | Controller, battery, inverter matching | You improve system stability across different weather |
Safety Checks After Installation
After you finish the installation, do not run the turbine for a long time immediately. First, complete a safety check. Then, perform a short test run. During the test, observe whether the rotor turns smoothly, whether the controller display is normal, and whether the system has abnormal vibration or noise.
You should confirm rough side inside, smooth side outside, and all nuts tightened evenly.
You should confirm long rods, short rods, protective sleeves, and rubber pads are installed correctly.
You should confirm the flange holes are aligned and the rotor rotates without friction.
You should confirm controller, battery, inverter, cable polarity, and protection devices are correct.
Maintenance Tips for Long-Term Use
To keep your R600 Liam F1 Wind Turbine running steadily, you should maintain it regularly. In daily use, you should focus on blade surface, fixing nuts, support rods, protective sleeves, cables, and controller status.
Monthly Check
You should check blade surface, fixing nuts, rotor rotation, and visible cable condition.
3–6 Month Check
You should inspect support rods, protective sleeves, cable connections, and controller status.
After Severe Weather
You should check the base, blades, rods, and fasteners after strong wind, heavy rain, or typhoon conditions.
Need Installation Support for R600 Liam F1 Wind Turbine?
If you are a B2B buyer, importer, installer, or distributor, you should not only focus on buying one turbine. Instead, you should work with a manufacturer that can provide installation guidance, system matching advice, and long-term after-sales support.
ELEGE provides R600 Liam F1 Wind Turbine installation guidance, system matching advice, wind-solar hybrid configuration support, and color customization services for global B2B buyers. Therefore, you can complete product delivery and customer support more easily.